In this section, we are not going into the technical aspect of VB programming, just have a feel of it. Now, you can try out the examples below:
Example 2.1.1 is a simple program . First of all, you have to launch
Microsoft Visual Basic. Normally, a default form Form1 will be available
for you to start your new project. Now, double click on form1, the source code
window for form1 will appear. Don't worry about the begining and the end
statements(i.e Private Sub Form_Load.......End Sub.); Just key in the
lines in between the above two statements exactly as are shown here.When you run
the program, you will be surprise that nothing shown up.In order to display the
output of the program, you have to add the Form1.show statement like in
Example 21.2 and Example 2.1.3. Try them out.
| Example 2.1.1
Private Sub Form_Load For i=1 to 5 End Sub |
Example 2.1.2
Private Sub Form_Load Form1.show End Sub |
Example 2.1.3
Private Sub Form_Load Form1.show End Sub |
2.2 Steps in Building a Visual Basic Application
Step 1 Draw the interface
Step 2 Set Properties
Step 3 Write the events code
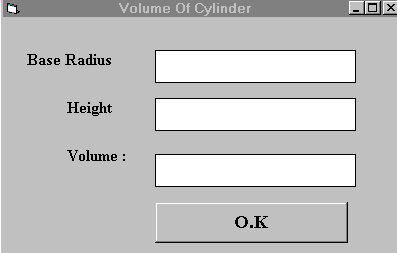
Example 2.1
This program is a simple program that calculate the volume of a cylinder. Let design the interface:
First of all, go to the properties window and change the form caption to Volume Of Cylinder. Then draw three label boxes and change their captions to Base Radius, height andvolume respectively. After that, draw three Text Boxes and clear its text contents so that you get three empty boxes. Named the text boxes asradius ,hght(we cannot use height as it is the built-in control name of VB)and volume respectively. Lastly, insert a command button and change its caption toO.K. and its name to OK. Now save the project as cylinder.vbp and the form as cylinder.vbp as well. We shall leave out the codes at the moment which you shall learn it in lesson3.
Example 2.2
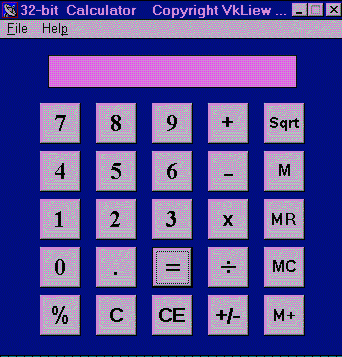
Designing an attractive and user friendly interface should be the first step in constructing a VB program. To illustrate, let's look at the calculator program.
 >
>
Now, please follow the following steps to design the calculator interface.
Resize the form until you get the size you are satisfed with.
| Go to the properties window and change the default caption to the caption
you want , such as 32 Calculator-----Designed by Vkliew.
| Change other properties of the form, such as background color,
foreground color , border style.I recommend you set the following
properties for Form1 for this calculator program: | |
| BorderStyle | Fixed Single |
| MaxButton | False |
| minButton | True |
Draw the Display Panel by clicking on the Label button and and place
your mouse on the form. Start drawing by pressing down your mouse button and
drag it along.
| Click on the panel and the corresponding properties window will appear.
Clear the default label so that the caption is blank(because the display
panel is supposed to show the number as we click on the number button). It
is good to set the background color to a bright color while the foreground
color should be something like black..(for easy viewing). Change the name to
display as I am going to use it later to write codes for the
calculator.
| Now draw the command buttons that are necessary to operate a calculator. I
suggest you follow exactly what is shown in the image above.
| Test run the project by pressing F5. If you are satisfied with the
appearance, go ahead to save the project. At the same time, you should also
save the file that contain your form. | |